Web 推送通知机制
潘忠显 / 2021-04-09
“JavaScript 工作原理”系列文章是翻译和整理自 SessionStack 网站的 How JavaScript works。因为博文发表于2017年,部分技术或信息可能已经过时。本文英文原文链接,作者 Alexander Zlatkov,翻译 潘忠显。
这是致力于探索JavaScript及其构建组件的系列文章的第9页。今天,我们将注意力转向Web推送通知:我们将了解它们的构建组件,探索发送/接收通知背后的过程。
Today we turn our attention to web push notifications: we’ll have a look at their building components, explore the processes behind sending/receiving notifications and at the end share how we at SessionStack plan on utilizing these to build new product functionality.
推送通知在移动世界中非常普遍。由于某种原因,即使开发人员强烈要求该功能,他们进入网络的时间也很晚。
Push Notifications are very common in the mobile world. For one reason or another, they made their entrance into the web pretty late, even though it has been a feature highly requested by developers.
Overview
Web推送通知使用户可以选择从Web应用程序中选择及时更新,以使他们的用户群重新吸引用户,这些内容可能对用户而言是有趣,重要且适时的。
Web Push Notifications allow users to opt-in for timely updates from web apps that aim to re-engage their user base with content that might be interesting, important and well-timed for the users.
推送基于服务工作者,我们在[上一篇文章]()中进行了详细讨论。
Push is based on Service Workers, which we discussed in detail in a previous post.
在这种情况下,雇用Service Worker的原因是因为他们在后台运行。这对Push Notifications很有用,因为这意味着仅当用户与通知本身交互时才执行其代码。
The reason for employing Service Workers, in this case, is because they operate in the background. This is great for Push Notifications because it means that their code is being executed only when a user interacts with the notification itself.
Push & notification
推送和通知是两个不同的API。
Push and notification are two different APIs.
-
推送 Push:在服务器向Service Worker提供信息时调用。
-
通知 Notification:-这是Service Worker或Web应用程序中向用户显示信息的脚本的操作。
-
Push — it is invoked when the server supplies information to a Service Worker.
-
Notification — this is the action of a Service Worker or a script in a web app that shows information to the user.
Push
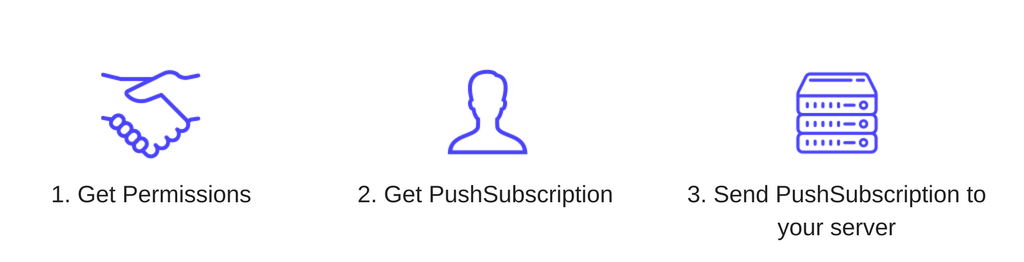
实施推送有三个一般步骤:
- UI(UI)—添加必要的客户端逻辑以使用户订阅推送。这是Web应用程序UI所需要的JavaScript逻辑,以使用户能够注册自己来推送消息。
- 发送推送消息 —在您的服务器上实现API调用,以触发向用户设备的推送消息。
- 接收推送消息-在推送消息到达浏览器后对其进行处理。
There are three general steps to implementing a push:
- The UI — adding the necessary client-side logic to subscribe a user to a push. This is the JavaScript logic that your web app UI needs in order to enable the user to register himself to push messages.
- Sending the push message — implementing the API call on your server that triggers a push message to the user’s device.
- Receiving the push message — handling the push message once it arrives in the browser.
现在,我们将更详细地描述整个过程。
Now we’ll describe the whole process in more detail.
Browser support detection
##浏览器支持检测
首先,我们需要检查当前的浏览器是否支持推送消息。我们可以通过两个简单的检查来检查是否支持推:
1.在“导航器”对象上检查“ serviceWorker” 2.在“ window”对象上检查“ PushManager”
First, we need to check if the current browser supports push messaging. We can check if push is supported by two simple checks:
- Check for
serviceWorkeron thenavigatorobject - Check for
PushManageron thewindowobject
两项检查均如下所示:
Both checks look like this:
if (!('serviceWorker' in navigator)) {
  // Service Worker isn't supported on this browser, disable or hide UI.
  return;
}

if (!('PushManager' in window)) {
  // Push isn't supported on this browser, disable or hide UI.
  return;
}
Register a Service Worker
##注册服务工作者
至此,我们知道该功能受支持。下一步是注册我们的服务人员。
从我们以前的帖子中,您应该[已经熟悉]()注册服务工作者。
At this point, we know that the feature is supported. The next step is to register our Service Worker.
Registering a Service Worker is something you should already be familiar with from a previous post of ours.
Requesting permission
##请求权限
注册服务工作者后,我们可以继续订阅用户。为此,我们需要获得他的许可才能向他发送推送消息。
获得许可的API相对简单,但是缺点是,该API [已从进行回调更改为返回Promise](https://developer.mozilla.org/zh-CN/docs/Web/API / Notification / requestPermission)。这就带来了一个问题:我们无法确定当前浏览器已实现了哪个版本的API,因此您必须同时实现和处理这两个版本。
After a Service Worker has been registered, we can proceed with subscribing the user. To do so, we need to get his permission to send him push messages.
The API for getting permission is relatively simple, the downside, however, is that the API has changed from taking a callback to returning a Promise. This introduces a problem: we can’t tell what version of the API has been implemented by the current browser, so you have to implement and handle both.
看起来像这样:
It looks something like this:
function requestPermission() {
  return new Promise(function(resolve, reject) {
    const permissionResult = Notification.requestPermission(function(result) {
      // Handling deprecated version with callback.
      resolve(result);
    });

    if (permissionResult) {
      permissionResult.then(resolve, reject);
    }
  })
  .then(function(permissionResult) {
    if (permissionResult !== 'granted') {
      throw new Error('Permission not granted.');
    }
  });
}
“ Notification.requestPermission()”调用将向用户显示以下提示:
The Notification.requestPermission() call will display the following prompt to the user:
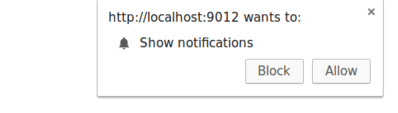
授予,关闭或阻止该权限后,我们将获得一个字符串形式的结果:“‘granted’,‘default’或’denied’。
Once the permission has been granted, closed, or blocked, we’ll be given the result as a string: ‘granted’, ‘default’ or ‘denied’.
请记住,如果用户单击“阻止”按钮,则您的Web应用将无法再次请求用户许可,直到他们通过更改许可状态手动“解除阻止”您的应用为止。此选项埋在设置面板中。
Keep in mind that if the user clicks on the Block button, your web app will not be able to ask the user for permission again until they manually “unblock” your app by changing the permission state. This option is buried in the settings panel.
Subscribing a user with PushManager
##使用PushManager订阅用户
一旦我们注册了Service Worker并获得了许可,我们便可以在您注册Service Worker时调用“ registration.pushManager.subscribe()”来订阅用户。
Once we have our Service Worker registered and we’ve got permission, we can subscribe a user by calling registration.pushManager.subscribe() when you register your Service Worker.
整个代码段可能看起来像这样(包括Service Worker注册):
The whole snippet might look like this (including the Service Worker registration):
function subscribeUserToPush() {
  return navigator.serviceWorker.register('service-worker.js')
  .then(function(registration) {
    var subscribeOptions = {
      userVisibleOnly: true,
      applicationServerKey: btoa(
        'BEl62iUYgUivxIkv69yViEuiBIa-Ib9-SkvMeAtA3LFgDzkrxZJjSgSnfckjBJuBkr3qBUYIHBQFLXYp5Nksh8U'
      )
    };

    return registration.pushManager.subscribe(subscribeOptions);
  })
  .then(function(pushSubscription) {
    console.log('PushSubscription: ', JSON.stringify(pushSubscription));
    return pushSubscription;
  });
}
registration.pushManager.subscribe(options)带有一个* options *对象,该对象由必需参数和可选参数组成:
The registration.pushManager.subscribe(options) takes an options object, which consists of both required and optional parameters:
-** userVisibleOnly :布尔值,指示返回的推送订阅将仅用于对用户可见的消息。必须将其设置为“ true”,否则会出现错误(有历史原因)。 - applicationServerKey **:一个Base64编码的DOMString或ArrayBuffer,其中包含一个公用密钥,推送服务器将使用该公用密钥对您的应用服务器进行身份验证。
- userVisibleOnly: A boolean indicating that the returned push subscription will only be used for messages which effect is made visible to the user. It has to be set to
trueotherwise you’ll get an error (there are historical reasons for this). - applicationServerKey: A Base64-encoded
DOMStringorArrayBuffercontaining a public key that the push server will use to authenticate your application server.
您的服务器需要生成一对**应用程序服务器密钥-**这些也称为VAPID密钥,这对于您的服务器而言是唯一的。它们是一对公钥和一个私钥。私钥秘密地存储在您的一端,而公钥则与客户端交换。通过这些键,推送服务可以知道哪个应用程序服务器订阅了用户,并确保该服务器与向该特定用户触发推送消息的服务器相同。
Your server needs to generate a pair of application server keys — these are also known as VAPID keys, which are unique to your server. They are a pair of a public and a private key. The private key is secretly stored on your end, while the public one gets exchanged with the client. The keys allow a push service to know which application server subscribed a user and ensure that it’s the same server that triggers the push messages to that particular user.
您只需为您的应用程序创建一次私钥/公钥对。一种方法是转到https://web-push-codelab.glitch.me/。
You need to create the private/public key pair only once for your application. One way of doing it is going to https://web-push-codelab.glitch.me/ .
订阅用户时,浏览器会将“ applicationServerKey”(公共密码)传递到推送服务上,这意味着推送服务可以将您应用程序的公钥绑定到用户的“ PushSubscription”上。
The browser passes the applicationServerKey (the public one) onto a push service when subscribing the user, meaning that the push service can tie your application’s public key to the user’s PushSubscription .
这是发生了什么:
-您的网络应用已加载,您调用subscribe()并传递了服务器密钥。
-浏览器向推送服务发出网络请求,该请求将生成一个终结点,将该终结点与密钥相关联,并将该终结点返回给浏览器。
-浏览器将此端点添加到“ PushSubscription”对象中,该对象通过“ subscribe()”承诺返回。
This is what happens:
- Your web app is loaded and you call
subscribe(), passing your server key. - The browser makes a network request to a push service that will generate an endpoint, associate this endpoint with the key and return the endpoint to the browser.
- The browser will add this endpoint to the
PushSubscriptionobject, which is returned via thesubscribe()promise.
以后,无论何时要发送推送消息,都需要创建** Authorization标头**,其中包含用您的应用程序服务器的私钥签名的信息。当推服务接收到发送推消息的请求时,它将通过查找已经链接到该特定端点的公共密钥来验证标头(第二步)。
Later, whenever you want to send a push message, you’ll need to create an Authorization header which contains information signed with your application server’s private key. When the push service receives a request to send a push message, it will validate the header by looking up the public key that it has already linked to that particular endpoint (the second step).
The PushSubscription object
PushSubscription对象
“ PushSubscription”包含将推送消息发送到用户设备所需的所有信息。它是这样的:
A PushSubscription contains all the information that is needed to send a push message to the user’s device. This is how it looks like:
{
  "endpoint": "https://domain.pushservice.com/some-id",
  "keys": {
    "p256dh":
"BIPUL12DLfytvTajnryr3PJdAgXS3HGMlLqndGcJGabyhHheJYlNGCeXl1dn18gSJ1WArAPIxr4gK0_dQds4yiI=",
    "auth":"FPssMOQPmLmXWmdSTdbKVw=="
  }
}
端点是推送服务URL。要触发推送消息,请对此URL发出POST请求。
The endpoint is the push services URL. To trigger a push message, make a POST request to this URL.
“ keys”对象包含用于加密与推送消息一起发送的消息数据的值。
The keys object contains the values used to encrypt message data sent with a push message.
订阅用户并拥有“ PushSubscription”后,您需要将其发送到服务器。在那里(在服务器上),您会将订阅保存到数据库中,并从现在开始使用它向该用户发送推送消息。
Once a user is subscribed and you have a PushSubscription you need to send it to your server. There (on the server) you’ll save the subscription to a database and from now on use it to send push messages to that user.
Sending the push message
发送PUSH消息
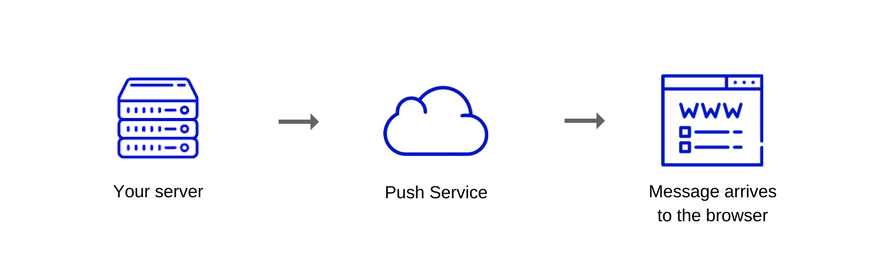
当您想向用户发送推送消息时,您需要的第一件事就是推送服务。您是在告诉推送服务(通过API调用)要发送哪些数据,将消息发送给谁以及有关如何发送消息的所有条件。通常,此API调用是从您的服务器完成的。
When you want to send a push message to your users, the first thing you need is a push service. You’re telling the push service (via API call) what data to send, who to send the message to and any criteria about how to send the message. Normally, this API call is done from your server.
Push Services
推送服务是一种接收请求,对其进行验证并将其发送到正确的浏览器的请求。
A push service is one that receives requests, validates them and delivers the push message to the proper browser.
请注意,推送服务不是由您管理的,而是第三方服务。您的服务器是通过API与推送服务进行通信的服务器。推送服务的示例是[Google的FCM](https://firebase.google.com/docs/cloud-messaging/)。
Note that the push service is not managed by you — it’s a third-party service. Your server is the one that communicates with the push service through an API. An example of a push service is Google’s FCM.
推式服务可处理所有繁重的工作。例如,如果浏览器处于脱机状态,则推送服务将使消息排队并等待,直到浏览器再次联机,然后再发送相应的消息。
The push service handles all the heavy lifting. For example, if the browser is offline, the push service will queue up messages and wait until the browser goes online again, before sending the respective message.
每个浏览器都可以使用他们想要的任何推送服务,而这是开发人员无法控制的。
Each browser can use any push service they want and this is something that’s beyond the control of the developer.
但是,所有推送服务都具有相同的API,因此不会造成实施上的困难。
All push services, however, have the same APIs so this doesn’t create implementation difficulties.
为了获得将处理您的推送消息请求的URL,您需要检查PushSubscription对象中endpoint的存储值。
In order to get the URL which will handle the requests for your push messages, you need to check the stored value of endpoint in the PushSubscription object.
Push Service API
推送服务API提供了一种向用户发送消息的方法。该API是[Web推送协议](https://tools.ietf.org/html/draft-ietf-webpush-protocol-12),它是一种IETF标准,定义了您如何对推送服务进行API调用。
您通过推送消息发送的数据必须经过加密。这样,可以防止推送服务查看发送的数据。这很重要,因为浏览器是决定要使用哪个推送服务的浏览器(它可能正在使用一些不受信任且不够安全的推送服务)。
对于每个推送消息,您还可以给出以下说明:
The Push Service API provides a way to send messages to a user. The API is the Web Push Protocol which is an IETF standard that defines how you make an API call to a push service.
The data you send with a push message must be encrypted. This way, you prevent push services from being able to view the data sent. This is important because the browser is the one that decides which push service to use (and it might be using some push service that is untrusted and not secure enough).
For each push message, you can also give the following instructions:
-** TTL **-定义在删除邮件之前,该邮件应该排队等待多长时间。 -优先级-定义每条消息的优先级,如果必须保留用户设备的电池寿命,则推送服务将仅发送高优先级的消息。 -主题-为推送消息提供主题名称,该名称将用相同的主题替换待处理的消息,这样,一旦设备启用,用户就不会收到过时的信息。
- TTL — defines for how long a message should be queued before it’s removed and not delivered.
- Priority — defines the priority of each message which will let the push service send only the high priority ones in case the user device’s battery life has to be preserved.
- Topic — gives a push message a topic name which will replace pending messages with the same topic so that once the device is active, the user won’t receive outdated information.
浏览器中的Push事件Push event in the browser
如上所述,一旦您将消息发送到推服务,消息将处于挂起状态,直到发生以下情况之一:
-设备在线。 -由于TTL,消息在队列中过期。
当推送服务传递消息时,浏览器将接收该消息,对其进行解密并在您的Service Worker中调度一个push事件。
Once you send the message to the push service as explained above, the message will be in a pending state until one of the following happens:
- The device comes online.
- The message expires on the queue due to the TTL.
很棒的是,即使您的网页未打开,浏览器也可以执行Service Worker。发生以下情况:
-推送消息到达浏览器并对其解密 -浏览器唤醒服务工作者 -将“ push”事件发送给服务人员
When the push service delivers a message, the browser will receive it, decrypt it and dispatch a push event in your Service Worker.
The great thing here is that the browser can execute your Service Worker even when your web page is not open. The following takes place:
- The push message arrives to the browser which decrypts it
- The browser wakes up the Service Worker
- A
pushevent is dispatched to the Service Worker
设置推送事件监听器的代码应与您用JavaScript编写的任何其他事件监听器非常相似:
The code for setting up a push event listener should be pretty similar to any other event listener you’d write in JavaScript:
self.addEventListener('push', function(event) {
  if (event.data) {
    console.log('This push event has data: ', event.data.text());
  } else {
    console.log('This push event has no data.');
  }
});
关于Service Workers,需要了解的一件事是,您几乎无法控制Service Worker代码的运行时间。浏览器决定何时唤醒它以及何时终止它。
One of the things to understand about Service Workers is that you have little control over the time the service worker code is going to run. The browser decides when to wake it up and when to terminate it.
在Service Worker中,event.waitUntil(promise)告诉浏览器工作正在进行中,直到承诺达成为止,并且如果希望完成该工作,则不应终止Service Worker。
这是处理push事件的示例:
In Service Workers, event.waitUntil(promise) tells the browser that work is ongoing until the promise settles, and it shouldn’t terminate the service worker if it wants that work to complete.
Here is an example of handling the push event:
self.addEventListener('push', function(event) {
  var promise = self.registration.showNotification('Push notification!');

  event.waitUntil(promise);
});
调用self.registration.showNotification()会向用户显示一条通知,并返回一个诺言,该诺言一旦显示就将解决。
可以在视觉上调整showNotification(title,options)方法以适应您的需求。 title参数是一个string,而options是一个看起来像这样的对象:
Calling self.registration.showNotification() displays a notification to the user and it returns a promise that will resolve once the notification has been displayed.
The showNotification(title, options) method can be visually tweaked to fit your needs. The title parameter is a string while options is an object that looks like this:
{
  "//": "Visual Options",
  "body": "<String>",
  "icon": "<URL String>",
  "image": "<URL String>",
  "badge": "<URL String>",
  "vibrate": "<Array of Integers>",
  "sound": "<URL String>",
  "dir": "<String of 'auto' | 'ltr' | 'rtl'>",

  "//": "Behavioural Options",
  "tag": "<String>",
  "data": "<Anything>",
  "requireInteraction": "<boolean>",
  "renotify": "<Boolean>",
  "silent": "<Boolean>",

  "//": "Both Visual & Behavioural Options",
  "actions": "<Array of Strings>",

  "//": "Information Option. No visual affect.",
  "timestamp": "<Long>"
}
您可以在此处详细了解每个选项的作用-https://developer.mozilla.org/en-US/docs/Web/API/ServiceWorkerRegistration/showNotification。
每当您想与用户共享紧急,重要和时效性信息时,推送通知都是吸引用户注意的好方法。
例如,我们在SessionStack计划利用推式通知在产品出现崩溃,问题或异常时通知用户。这将使我们的用户立即知道发生了什么问题。然后,他们可以通过视频重播该问题,并利用我们的库收集的数据(例如DOM更改,用户交互,网络请求,未处理的异常和调试消息)来查看最终用户发生的一切。
You can read in more detail what each option does here — https://developer.mozilla.org/en-US/docs/Web/API/ServiceWorkerRegistration/showNotification.
Push notifications can be a great way of getting your users’ attention whenever there is urgent, important and time-sensitive information that you’d like to share with them.
We at SessionStack for example, plan to utilize push notifications to let our users know when there is a crash, issue or anomaly in their product. This will let our users know immediately there is something wrong going on. Then, they can replay the issue as a video and see everything that happened to their end-user by leveraging the data that was collected by our library such as DOM changes, user interactions, network requests, unhandled exceptions and debug messages.
此功能不仅可以帮助我们的用户理解和重现任何问题,而且还可以使客户在发生问题时立即得到提醒。
Not only will this feature help our users understand and reproduce any issue but it will also enable customers to get alerted as soon as it happens.
Resources
- https://developers.google.com/web/fundamentals/push-notifications/
- https://developers.google.com/web/fundamentals/push-notifications/how-push-works
- https://developers.google.com/web/fundamentals/push-notifications/subscribing-a-user
- https://developers.google.com/web/fundamentals/push-notifications/handling-messages